
I have tried a few installer authoring tools by now, and I thought it would be fun to compare them by doing the same project with different packagers. At the same time I will show my workflow for repackaging installers, and although I chose a game for this project the process would be pretty much the same for a piece of software used in a an enterprise setting. So this is part 1 where I will be using Inno Setup.
- Install the base game Command & Conquer: Generals
- Install the expansion pack Command & Conquer: Generals - Zero Hour
- Install GenPatcher which enables widescreen resolutions and fixes various issues
Set the serial key in the registrydoes not seem to be necessary after running GenPatcher- Install the official patches for the base game and the official patches for the expansion
- Add official extra maps and missions
- Skip startup game intro
- Install prerequisites for the game
- Add rules to Windows Defender Firewall
- Remove all game folders and registry keys when uninstalling
Note: I wrote this article as I went a long, and I had to do some things a little differently than I initially had thought, so this isn’t meant as a step-by-step guide, but just a description of the process. Make sure to read the notes.
First thing first: extracting the original
Note: I ended up just installing the game from the CD-ROM’s, installing the official patches, running GenPatcher and copying all the installed files to C:\Temp\ccgeninstaller in subfolders named after the destination folders. I would rather have extracted the files from the installer as described below, but I wasn’t able to run the game after doing that, because GenPather needs to be run. I also couldn’t figure out how to extract the official patches.
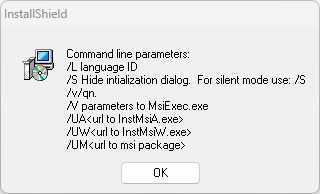
Amongs the files was setup.exe, and when running it I noticed that the title of the window was “InstallShield Wizard”. Amongst the installation files was also Command & Conquer Generals.msi, and running this command:
setup.exe /?
Shows me the valid command line parameters for the installer, including /V parameters to MsiExec.exe, so I think it’s a safe bet that it’s an MSI based InstallShield installer. I tried extracting setup.exe without luck but I was able to extract Command & Conquer Generals.msi to C:\Temp\ccgen:
msiexec /a "Command & Conquer Generals.msi" /qb TARGETDIR=C:\Temp\ccgen
I did the same thing for the expansion.
From extracting the files and reading on PCGamingWiki, I found out that files are installed to these folders:
- %USERPROFILE%\Documents\Command and Conquer Generals Data
- %USERPROFILE%\Documents\Command and Conquer Generals Zero Hour Data
- %PROGRAMFILES(X86)%\EA Games\Command and Conquer Generals
- %PROGRAMFILES(X86)%\EA Games\Command & Conquer Generals Zero Hour
- %WINDIR%\Fonts (a single font)
Finding registries
As mentioned, I want the installer to make a nice clean up when uninstalling, so I need to know what registries the game will create. Most applications and games will create a key in HKEY_LOCAL_MACHINE\SOFTWARE\WOW6432Node if it’s a 32 bit application, or in HKEY_LOCAL_MACHINE\SOFTWARE if it’s a 64 bit application and save all the necessary registries in that and that’s it, but some save registries all over the registry database. To find out, I go through the tedious process of taking a snapshot of the registry database with regshot, installing and running the game and then taking a new snapshot and comparing them. I found out that these keys a used by the game and will need to be removed during uninstallation:
- HKEY_LOCAL_MACHINE\SOFTWARE\WOW6432Node\EA Games\Command and Conquer Generals Zero Hour
- HKEY_LOCAL_MACHINE\SOFTWARE\WOW6432Node\Electronic Arts\EA Games\Generals
- HKEY_LOCAL_MACHINE\SOFTWARE\WOW6432Node\Electronic Arts\EA Games\Command and Conquer Generals Zero Hour
I also found out that GenPatcher sets some compatibility settings on a few of the executable files and adds some exclusions to Windows Security (Windows Defender), but more on that later.
Inno Setup
I recently started using Inno Setup and it’s quickly becoming my favorite because it’s free and pretty easy to use if using Inno Script Studio. I have sometimes experienced that some of the script will be overwritten - I don’t know if it’s when I edit the code, then jump back to using the GUI, or maybe when adding files, then registries and then some more files - but it’s something to look out for. If some functionality that doesn’t come right out the box is needed, Pascal Scripting can be used, but that doesn’t come super easy for me so often times I will save a PowerShell script to %TEMP% and have the installer invoke it. It is also possible to run command line utilities hidden and that is done quite a few times in the Install Run section.
But let’s get going.
Setup Options
- In the top menu, Project -> Setup Options -> Application Details, the application name and version is set.
- On Application Folder the default installation directory is set.
- On Program Group the name of the folder in the Start Menu is set.
- On Uninstall Settings the name and icon in Apps (Programs and Features) are set.
- On Compression the compression type and level is set.
- Hit OK.
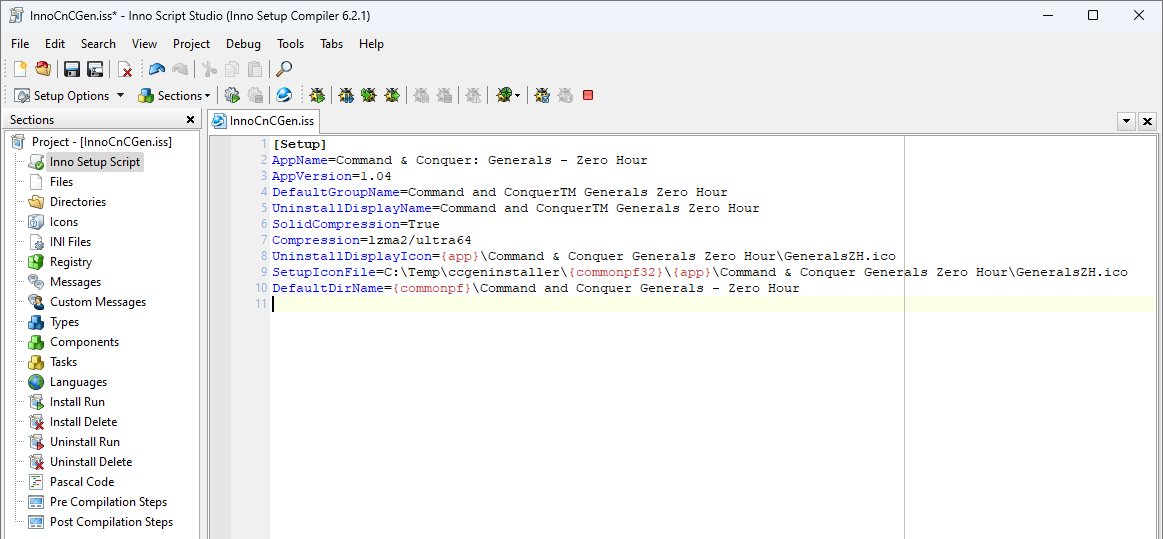
- I don’t think it’s possible to set the icon of the installation file or the one used in Apps, but I know from the documention that it can be set in the script, so I’ll add that. This is what we end up with for now:
Note: I usually try to keep the compression to a minimum or none at all, because I’d rather have a fast installer than a small installer, but there is a ~2 GB (2.1B bytes) limit to a single file installer, and to stay under that I had to go for maximum compression in this case.
Files
To Program Files (x86)
In the left pane the Files section is selected. Folders can be dragged and dropped into Inno Script Studio, so I did this with the folders Command and Conquer Generals and Command & Conquer Generals Zero Hour. In the Add Folders window I ticked Add directory, Add sub directories and Add files. Afterwards, to skip the startup game intros, I deleted the EA_LOGO.BIK and EA_LOGO640.BIK, as mentioned on PCGamingWiki, but kept the other files mentioned to not remove the video explaining the story of the game.
To Documents
See in the column Destination Folder that folders dragged and dropped like this will be copied to {app}, which is a constant that translates to the directory the user chooses as the installation destination when running the installer. This complicates things when it comes to the files that should be installed to the users Documents folder, so I started by deleting the files and folders that the game will generate when running:
- C:\Temp\ccgeninstaller{userdocs}\Command and Conquer Generals Data\MapPreviews
- C:\Temp\ccgeninstaller{userdocs}\Command and Conquer Generals Data\Replays
- C:\Temp\ccgeninstaller{userdocs}\Command and Conquer Generals Data\options.ini
- C:\Temp\ccgeninstaller{userdocs}\Command and Conquer Generals Data\Skirmish.ini
- C:\Temp\ccgeninstaller{userdocs}\Command and Conquer Generals Zero Hour Data\MapPreviews
- C:\Temp\ccgeninstaller{userdocs}\Command and Conquer Generals Zero Hour Data\Maps\MapCache.ini
- C:\Temp\ccgeninstaller{userdocs}\Command and Conquer Generals Zero Hour Data\Replays
- C:\Temp\ccgeninstaller{userdocs}\Command and Conquer Generals Zero Hour Data\Network.ini
- C:\Temp\ccgeninstaller{userdocs}\Command and Conquer Generals Zero Hour Data\options.ini
- C:\Temp\ccgeninstaller{userdocs}\Command and Conquer Generals Zero Hour Data\Skirmish.ini
This was also a good time to add the custom maps as described on PCGamingWiki. Like the constant {app}, there also exist a constant for a users document folder, {userdocs}.
Then I dragged and dropped Command and Conquer Generals Data and Command and Conquer Generals Zero Hour Data to Inno Script Studio. Because I downloaded extra maps with GenPatcher, this adds more than 1000 files. It’s not viable to change the destination in so many lines in Inno Script Studio, and I’ve had this problem before, so this time I made a PowerShell script to handle it:
|
|
To a temporary directory
Then the installation files for the prerequisites (Microsoft DirectX® End-User Runtime, Microsoft Visual C++ 2005 Service Pack 1, Microsoft Visual C++ 2008 Service Pack 1 and Microsoft Visual C++ 2010 Service Pack 1). They are dragged and dropped like before but since it’s only 4 files, we can double click each one and set Destination Dir to the constant {tmp}. We also need to go to the Flags section, select the tab (Un)Install and tick of deleteafterinstall:
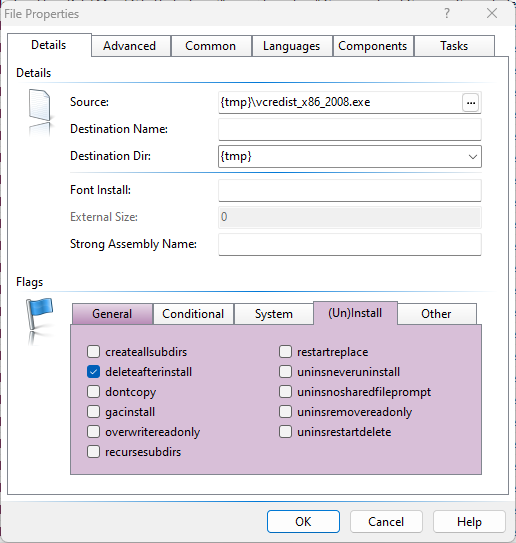
Now the files will be copied to a temporary directory used by Inno Setup and deleted when the installation is done. We’ll configure the installer to install the prerequisites from these files later in the Install Run section.
Note: I download Microsoft DirectX® End-User Runtime as a single file but when running it even with the silent install parameter, it’s necessary to pick a location to extract the files. All these extracted files had to be added to the installer instead so I used the PowerShell script again, also to add the deleteafterinstall flag.
The font
If I remember correctly, way back in the day a font would be installed by just copying it to C:\Windows\Font, now registries are needed too, but it is pretty easy to install with Inno Setup. In the documentation for the files section a FontInstall parameter is mentioned, that sets that the file needs to be installed as a font.
Icons
Moving on to the Icons section which, in Inno Setup, means shortcut. If New Item is pressed the options are pretty self-explanatory, but it is worth mentioning that that constants are supported and should be used. The constant, {group}, is the folder that will be created in the start menu, and this folder was set in the Setup section. Should a shortcut be put on the Public Desktop, the destination should be {commondesktop}.
Registry
Registries have to be made individually with the New Item button. I haven’t found a simpler way, unfortunately - it would be nice to be able to import a REG file for example. It’s worth mentioning that, again, constants can and should be used. Also that it’s important to keep an eye on the root when creating a new registry. Here’s an example:
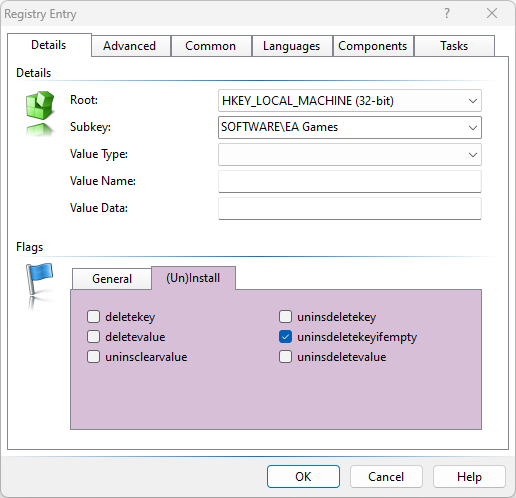
Choosing either HKEY_LOCAL_MACHINE (32-bit) or HKEY_LOCAL_MACHINE, in both cases HKEY_LOCAL_MACHINE\SOFTWARE\WOW6432Node\EA Games will be created, that means that if something needs to be put outside WOW6432Node the root should be HKEY_LOCAL_MACHINE (64-bit).
Note: I have only ever made packages for 32-bit applications installed on a 64-bit Windows operating system, so what’s described above may be different with other processor architectures.
AppCompatFlags\Layers for example needs to be installed outside WOW6432Node. In the properties window of an executable file there is a tab called Compatibility, and some of these options needs to be set in order to run the game. They are stored in the registry database, and that’s how the installer will set them. Here’s an example of the needed settings and how they’re set by the installer - notice the ticked boxes and the correspondent value data:
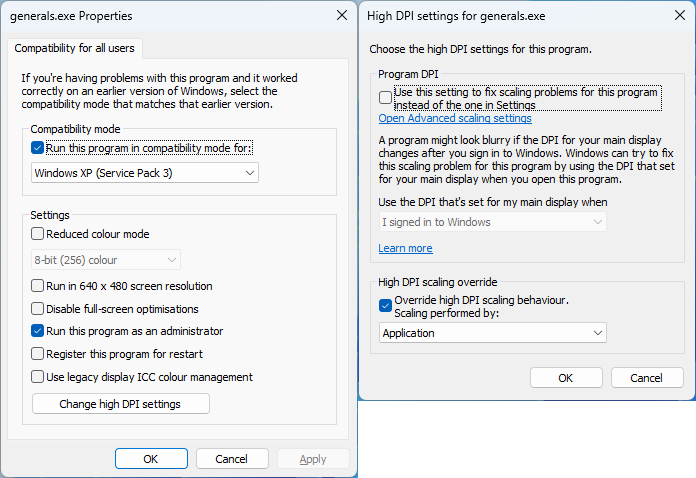
- Root: HKEY_LOCAL_MACHINE (64-bit)
- Subkey: SOFTWARE\Microsoft\Windows NT\CurrentVersion\AppCompatFlags\Layers
- Value Type: string
- Value Name: {app}\Command and Conquer Generals\Generals.exe
- Value Data: ~ RUNASADMIN HIGHDPIAWARE WINXPSP3
In the first example with HKEY_LOCAL_MACHINE\SOFTWARE\WOW6432Node\EA Games the flag uninstalldeletekeyifempty was set, which means that the key will only be deleted if it’s empty. This is preferable because it’s not unlikely that other EA games are installed, and their related registries shouldn’t be deleted just because Generals is. The subkey HKEY_LOCAL_MACHINE\SOFTWARE\EA Games\Command and Conquer Generals Zero Hour however, should always be deleted no matter how many values or subkeys it contains, and the flag uninstalldeletekey is ticked.
When Inno Setup installs, it starts from the top of the list, but when uninstalling, it starts deleting from the bottom. This is the case in all sections, but it’s especially important to keep in mind with registries because of the uninstalldelete flags and how the tree of registry keys is created. Files are a little bit easier to clean up because of the Uninstall Delete section.
Install Run
This is where prerequisites and other applications can be installed, and it’s also where Inno Setup’s limits are circumvented. It basically just adds the option to execute commands after the application is installed. There’s a Windows command for almost everything, and if there isn’t, there’s probably a PowerShell cmdlet or a .Net class that you can call from PowerShell, so this section adds unlimited possibilities.
So obviously, this is where Microsoft DirectX® End-User Runtime, Microsoft Visual C++ 2005 Service Pack 1, Microsoft Visual C++ 2008 Service Pack 1 and Microsoft Visual C++ 2010 Service Pack 1 are installed with their respective silent parameter, which for the most part can be found with the /? switch as shown when I extracted the files, but with DirectX® I had to guess. It’s usually one of these:
- /Q
- /quiet
- /S
- /silent
Firewall rules could be added by creating string values in the registry database, but I think it’s easier and cleaner to use the netsh advfirewall command.
As mentioned earlier when finding registries, GenPatcher add some antivirus exclusions, and I really don’t think any installer should do that, but I added it anyway. I tried doing it by adding the registries, but the installer would fail with access denied, which makes sense; it shouldn’t be so easy to manipulate. Then I found out that there’s the Add-MpPreference PowerShell cmdlet, so I used that instead.
These are the commands run by this installer:
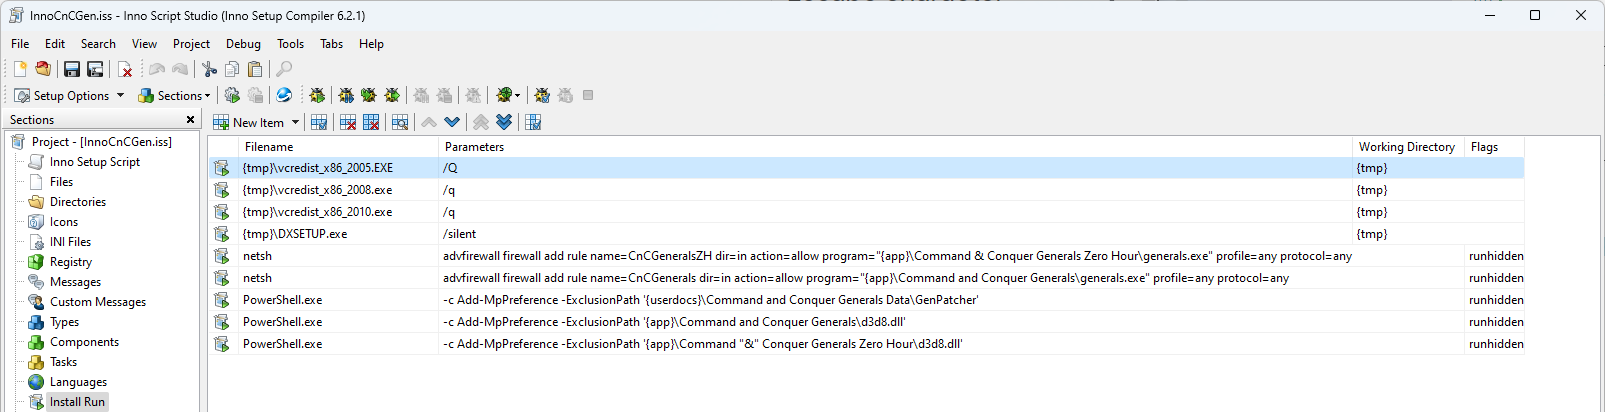
Note: In PowerShell, the ampersand is the call operator, also know as the invocation operator. And since it’s part of the path to the installed files, it needs to be “escaped” by double quotes.
Uninstall Run
This section is for the commands that should be executed after uninstalling the application. This I use for cleaning up what was added in the Install Run section, in this case the firewall rules and antivirus , but I never uninstall prerequisites as it could be needed by other installed applications.
I couldn’t figure out how to delete the firewall rules with the netsh advfirewall command, because apparently the name specified when creating them can’t be used when deleting them. I could, however, figure out how to do it with PowerShell:
PowerShell.exe -c Get-NetFirewallRule -Name *generals.exe | Remove-NetFirewallRule
Uninstall Delete
Finally at the last section of this installer. During an uninstallation process, only files and registries added by the installer are removed by default, but oftentimes a game or application will add more when being used. In this case, for example, save games and replays are saved to a folder in %USERPROFILE%\Documents\Command and Conquer Generals Data, and this section is for handling things like that. I always just add all the top level folders I find while extracting the original installer - but I skipped %WINDIR%\Fonts of course, of course.
Final thoughts
Now the only thing left to do is to press Project -> Compile and the install package will be save to a folder called Output in the same folder as the Inno Setup script.
I reached all my goals and ended up with a single file installer a little smaller that 2 GB extracting a little more than 3 GB worth of files, for free and pretty easily. Other packages would have made life even easier though. For example, I know that other packagers don’t need to use netsh advfirewall to create firewall rules, and I don’t think it’s viable to have to use a PowerShell script to move many files from the default installation directory to another destination folder.
But then again, it’s free, it’s fast, and it has great documentation. Will use again.
You can download the install script in its entirety here.